Wednesday, February 20, 2013

Rivets!! Part One... Because there are soooo many possibilities!!


I love rivets. Rivets can be made out of wire or tubes. The trick is to drill a hole that is the same size or just a tiny bit bigger then the wire. Use a wire gauge to measure your drill bit to match your wire.  I like to file the ends of the wire before making the rivet.  An easy way to start a rivet is hold the wire in a flame and let the wire ball up - and vola! you have something to smash with your hammer :)


16 gauge copper wire with a similarly sized drill bit ready to
clamp some silver and copper together.

Use a nail and hammer to create a dent or depression in  your metal for the drill bit.
This will keep the drill bit from sliding around and scratching your metal.
When riveting two pieces of metal together you need to drill a hole through both of them. Make sure you know where you want your rivet and drill a hole through the first piece of metal. In the above photo I am using a nail to tap a dent into the silver, this will help catch the drill bit so the drill bit won't skate around and scratch your metal while you are drilling. You can use a nail or a punch or a screw... Anything that has a little point to it that will make a nice depression for your drill bit.

Then use your first piece of metal with the drilled hole as a guide for placing the second hole in the second piece of metal. Drill the hole in the second piece of metal. Now your pieces of metal should line up as you want them when you place your rivet in your piece.

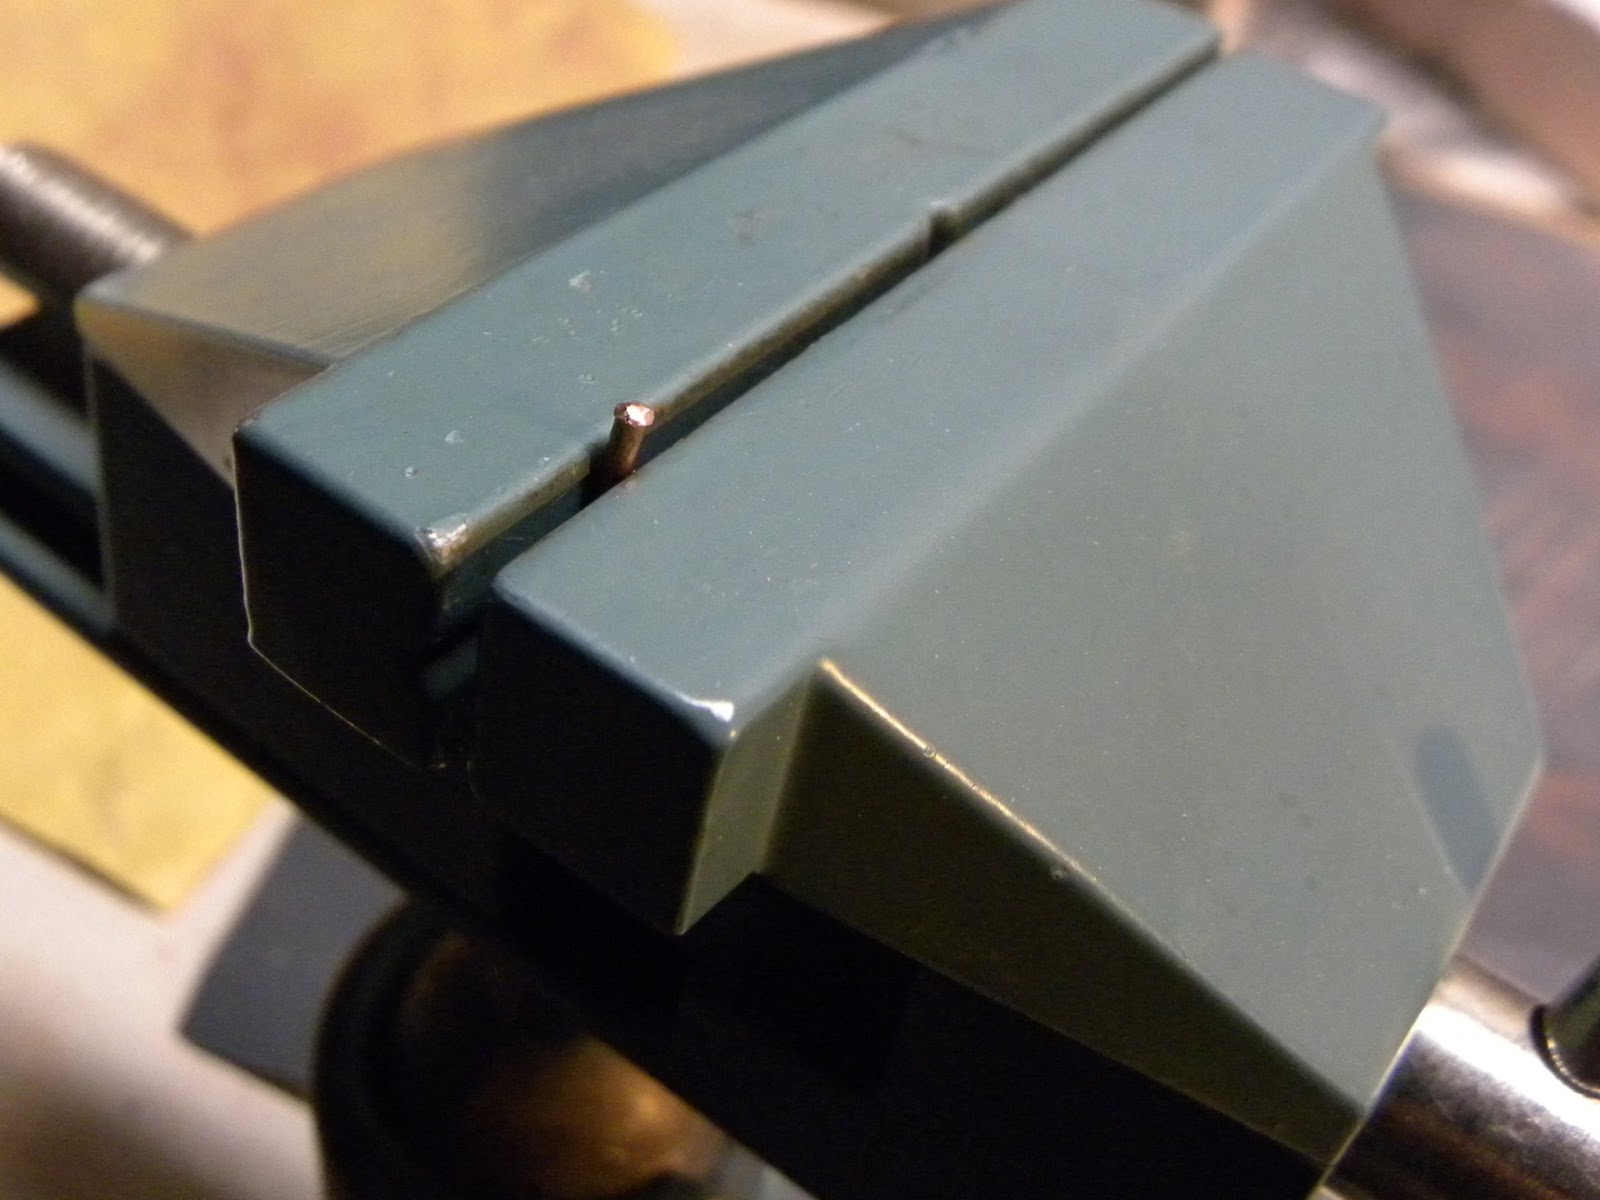
It is now time to work on your rivet. If you have not chosen to ball up your wire in a flame to start your rivet you will file or sand your wire so it is smooth and place it in a vise. Have just a little bit of the wire sticking up  out of the vise and clamp it down very tightly.

Here you can see the very beginnings of a head on the wire.
 Tapping with a hammer on the edge of the wire is how you grow the head of a rivet. Hit the wire at about a 45 degree angle, all around the wire. You will be hitting just the edge of the wire. You do not need to hit very hard, especially with copper, it is pretty soft. Gradually work your way around the wire many times until the rivet is big enough to not fall through the drilled holes in your work.
The rivet is seen from the underside of the copper disc.

The wire with the rivet on the end is threaded on to the copper disc.

The silver is added to the piece. Measure and trim the wire.
Finishing the rivet is easy. Trim the wire so it is only a one or two millimeters above your work. You do not need much to make the second head of the rivet. Remember as you are hammering on your steel bench block, you will also be having an effect on the backside of the piece.  This bench block in the photo is new, but not as smooth and shiny as my old bench block and it will leave a texture on the back side of this piece.  Hammer the same as you did when the wire was in the vise.  Hammer the edge of the wire first. As the head of the wire spreads out you can hammer more directly on top to finish out the spread of your rivet.
 You can choose to finish your rivet in different ways.  Hammer your rivet flat, as shown here.

Reverse side of piece.
 Or use a balled up wire, without hammering as a rivet as shown below
The smaller earrings in the center look as if they have a rivet in them.
OK technically that isn't a rivet in the earrings above because the silver is actually the ear wire. But it has the appearance of a rivet in the center earrings.
This bracelet has a stone held on by wire rivets. The rivets are on the underside of the bracelet and the sterling silver wire "grows" up and around the green kambaba jasper.


Thursday, February 14, 2013

My Favorite Metalsmiths


There are so many wonderful instructors and books out there so here is a list of ...

My Favorite Web Sites

Connie Fox:  I order tools and always look at her latest educational posts or videos if she has any. http://www.jatayu.com/

Interweave Press has several magazines and a nice web site for all of them.  Lapidary Journal has gotten smaller over the years but still has good information, projects and photos: http://www.jewelrymakingdaily.com/blogs/jewelryartistmagazine/default.aspx

Rio Grande for tools, gems and display items. They also have good educational videos and I like their group on Facebook: http://www.riogrande.com/

Otto Frei, a tool resource: http://www.ottofrei.com/store/home.php

Society of American Silversmiths: http://www.silversmithing.com/index.htm

Facebook group called “Bench Tips” by Brad Smith. I don’t know who he is but he has great tips:
http://www.facebook.com/#!/BenchTips?sk=info

Fire Mountain Gems:  http://www.firemountaingems.com/


My Favorite Books:
Tim McCreight – The Man: http://www.brynmorgen.com/mccreight.html
  Complete Metalsmith (several editions, I have the student edition)
  Jewelry: Fundamentals of Metalsmithing
 
And other books and dvds by him and other authors/metalsmiths

Susan Lenart Kazmer: Making Connections: A Handbook of Cold Joins for Jewelers and Mixed Media Artists. 

Jinks McGrath: The Encyclopedia of Jewelry-Making Techniques: A Comprehensive Visual Guide to Traditional and Contemporary Techniques

I have others, this is just a start. Check 'em out!

This is what Beginning Metals Class looks like.


Blank.


Nothing.


Possibilities


New Creativity.

A chance to go in any direction you want. Make jewelry, make a sculpture, make a vessel. You can do any of that and more with metals. Metal can be worked like clay as you hit it with a hammer, it moves and stretches. Metal can have textures and designs imprinted on them with pressure or chemicals. Metal can be constructed with folds and rivets.

When teaching metals I spend the majority of the time teaching the proper use of the tools. There are lots of fabulous tools. There are lots of cool techniques. But it takes a long time to get through these and practice a bit so one feels comfortable enough to work with the tools. So there is never much time to study creativity and design and form in only 5 or 6 classes...Hopefully we can use this blog as a resource for some of that.

But as always first is tools.
No wait. First is safety.
Wear eye protection
Tie your hair back.
Don't wear loose clothing or jewelry.

Sawing is the first thing to learn. I love to saw. And despite what a few artists or instructors will tell you or write in books, you can learn to saw without breaking blades left and right.  So see my post on sawing for more on that :) Sawing

Then is filing: Take the time to file. It will pay off!

Also learn about sand paper.  Grits - the smaller the number the larger the grit. I discovered that you can get 1000, 2000, 2500 grit sandpaper at the auto parts store.

Next hammers and bench blocks

Tuesday, February 12, 2013

Wirework!

So I still don't know everything I should probably know about this blogging thing. Like, are you supposed to start a new page every time you make a new entry or just keep adding to the same page?

And of course I wonder if anyone will read this but I guess it is ok if no one does because one thing this blog helps me do is straighten my brain. As I plan to teach my next class I have been thinking how can I present the information for my students on the blog, and I think that helps to create some order to my curriculum.  Which is good because I am a little scatter brained and when I start teaching I get excited and possibly a bit carried away.

Having the chance to do anything creative is a blessing.  Being able to do it in a warm, inviting, friendly atmosphere is wonderful.  Being able to pass on some knowledge while learning from others at the same time is priceless.

So I am working on preparing for two classes that start this week.  The one tonight is Wire Work. Take some wire; copper, silver etc and cut and file and create a headpin.  Curl the end with round pliers. Smash the end with your hammer and a steel bench block, ball up the end with a torch. Learn how to make a wrapped eye loop. Now you are ready to add some gorgeous beads. I love beads. I use only natural gemstones, no dyes.


  • Full Disclosure: I struggle sometimes with using metal and gemstones in my jewelry. I love nature and have been a naturalist and am still lucky enough to help teach environmental education. Natural gemstones and metals are mined from our planet earth. That can be a huge impact on the earth. We as humans need to reduce the impact we each have on the earth.  At the same time, gemstones and copper and silver are beautiful creations.  I draw my designs from nature. My stones remind me that it is part of the earth and I am part of the earth. Take care of it. It is all we have. The gemstones I choose are not dyed, simply polished to show their natural beauty. The name "Silver Leaf" comes from one of my favorite jaspers - Silver Leaf Jasper.  So share your art with others but try to limit your impact. Purchase metal from recycled sources (ie Hoover and Strong), gems from conflict free suppliers etc.
  • Hoover and Strong explain this delima pretty well on this web page:             https://www.hooverandstrong.com/harmony-at-hoover-and-strong

Then take another piece of wire - file the ends, you want them wonderfully smooth so they do not scratch or snag on clothing. Create an eye loop, string on a bead, create a second eye loop and Wala! You have a bead link!
Amethyst and freshwater pearl bead link earrings

Once you learn how to make the headpins and ear wires well, you can make them quickly. These have some sterling silver spacer beads added to help draw the eye to the gemstone.

Simple, hoop earrings with smokey quartz

Swirls and large jump rings make for  a fun bracelet, this was shot before  soldering the jump rings closed. The wire  gauge is not very thick so therefore the jump rings may come open which is why I like to solder them closed.

Lots of fun with wire work, twisting, hammering, playing...

Coil wire around a mandrel such as a knitting needle. Make nice, tight pretty coils. Now you can cut the coils apart with your wire cutters or saw them apart to create wonderful jump rings.

Take large gauge wire such as 14 or 12 gauge and make beautiful clasps. Make a swan clasp, S-Curve Clasp or a funky free form Clasp. Use your hammer to planish or give it some texture. Use the same gauge wire to make a strong jump ring for your clasp to grab a hold of to hold your beautiful creation safe on your wrist.

Create any number of different shapes with 20 gauge wire after having very carefully filed, sanded and smoothed the ends of the wire, for ear wires.

That is what we will be exploring tonight and the next 2 Tuesday nights at The Workspace. 


Thursday, February 7, 2013

Files - An Important Step in Finishing

My students and I grabbing the closest tool and hamming it up for the camera.
Rings class at The Workspace was very successful!  
The goal of the rings class is to learn how to do three things and learn to do them well enough that a student feels confident to continue learning and creating on their own.  Sawing, filing and soldering.  See my earlier post regarding sawing. This post will discuss filing.

Filing is very important and it can be a crucial step that helps to create a beautiful piece of art. It is important  to understand files, what they are made of and how using them properly will help in achieving a professional finish with your pieces.

Files, specifically jewelers files (also called needle files), are made of steel and like sandpaper, have a range of textures from coarse to fine. It is nice to have some coarse (00 or "rough") and some fine (all the way up to 8 or "super smooth") files.  Files quickly clean up burs and rough edges and straighten a crooked cut.  They also come in different shapes so you can file in small tight spaces and round spaces and square spaces...  So think about your end goal and choose the appropriate file for the job.  I like files that have a smooth side so while filing in a tight space you have less chance of scratching an area with the back side of the file.  Because sometimes you only need to file a certain area and the surrounding area may already have a nice finish.

It is usually taught that you must use a file in only one direction.  Some files only cut in one direction. Also, cutting in one direction will help your file to last longer. To file your piece, stroke the file along the edge that needs smoothing, firmly; then pick up the file and return to the start and cut again. Do not rub the file back and forth on your piece.

Files: A rough, round file. A flat cross-cut file (teeth going two directions). A flat file that has teeth all the way around and is a bit thicker. A file showing a smooth back side to protect the rest of your work. A flat file that only has teeth on the edges.  A fine cut file that is also a cross-cut file.

Above is a photo of just a few of the files I have.  I have not spent a lot of money on the rougher files, but as I slowly increase the size of my jewelers bench I will add higher quality fine cut files. The file on the far right is only a #2 but still is a fairly smooth file. With a nice smooth file I can quickly file the end of an ear wire about as fast as I can run a cup bur over it with my Foredom drill.  Note: all of my ear wires get tumbled with stainless steel shot to burnish the ends for an extra smooth finish that is comfortable to put in your ear and it also work hardens the wire and makes them stronger.
Not a great picture but this person is filing a piece of silver with a needle file and resting on the bench is a large flat file. Flat files are usually sold without a handle and you can have a wooden or plastic handle that you can use with your flat file.  I am not sure why they are sold this way. But I do not have a handle on my flat files. I leave them on my bench, flat, and rub my metal on the file as it lays there because I am usually using the flat file to smooth the edge of my metal that I had just completed sawing and I am attempting to get a straight, smooth, sometimes 90 degree edge.


Filing is not the end of the process when finishing jewelry. Jewelry needs to be comfortable and you don't want it to get caught in hair or snag clothing.  After filing, you move to sandpaper. Just like in filing you start with rougher sandpaper and move to finer grit sandpaper. THEN after that you can begin polishing with polishing compound and a buffer wheel or special polishing wheels made specifically for the Foredom or Dremel drills.  Tumbling is also a great option for polishing/burnishing metal.

Filing a copper ring. Note the pack of jewelers files resting on the bench. You can usually get a set of files fairly inexpensively. They will come in a few different shapes.  Note the injury to the hand in the photo did not occur during class :) 

So much fun stuff to learn, so many fun tools.

Sign up for my metals classes so you can learn more!!
http://www.sac.iastate.edu/index.cfm?nodeID=20175&audienceID=1&action=detail&eventid=27308


More pics from Rings Class
Hammering texture to copper

Cutting out a circle to add to a ring as a decorative element.


Sunday, February 3, 2013

Saw Blades Chart Thanks to Tim McCreight

Tim McCreight is a name you want to know when you really want to learn about metalsmithing.  Click here to get a list of his books. He has taught metalsmithing for years and now he has even embraced metal clay and is considered an expert in that medium as well.

I refer to my "Complete Metalsmith" and "Jewelry: Fundamentals of Metalsmithing" books frequently. "Fundamentals" has several tables that are helpful.

This is from page 10 of "Jewelry: Fundamentals of Metalsmithing" - a table for selecting saw blades.

From finest blades to coarser blades:
Blade Size               Use With B&S Gauge
   8/0                                     26
   6/0                                     24
   4/0                                     22
   2/0                                     22
   0                                        20
   1                                        20
   2                                      16/18
   3                                      12/14
   4                                        10
   5                                         8

I must admit that I do not have a very large selection of saw blades. If I have to I "make do" with what I have. But buy a few sizes of blades that correspond with the gauge of metal you will be working with most often.